탭을 통해 여러 화면(Activity)을 한 화면에서 보여지도록 하는 컨테이너 입니다.
구조는 다음과 같습니다
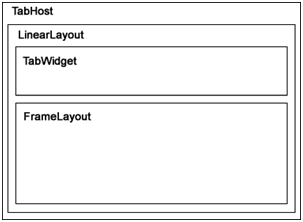
TabHost : 컨테이너
LinearLayout : widget 과, frameLayout 를 구성하는 Layout
TabWidget : tab 선택버튼
FrameLayout : tab 버튼을 선택했을때 나타나는 화면을 나타낼 Layout
<탭 작성 방법1. - 일반 Activity를 사용하는 경우 >
1) 탭 호스트 얻어오기
- findVIewById를 통해 탭호스트를 얻어옵니다.
2) 하나의 탭을 구성하는 객체인 TabSpec객체 생성하기
- 탭호스트의 newTabSpec 메소드를 이용하여 지정합니다
3) 탭에 여러가지 정보 셋팅
- 탭의 문자열 : setIndicator()
- 탭에 View 연결 : setContent();
4) 탭호스트에 탭스펙을 추가하기.
※ 주의사항 :위의 순서대로 작업했을 경우, 우리가 알고 있는 tab 의 화면이 나타나도록 하기 위해서는 xml 을 디자인 할 때
TabWidget의 아이디는 android:id="@android:id/tabs"
FrameLayout의 아이디는 android:id="@android:id/tabcontent" 로 지정해주셔야 합니다.
<탭 작성 방법2. - 일반 Activity를 사용하는 경우 >
방법1 과 같은 순서로 진행되지만, 1) 탭 호스트 얻어오기 에서 getTabHost()를 이용합니다.
※ 주의사항 : TabHost의 아이디는 android:id="@android:id/tabhost"
TabWidget의 아이디는 android:id="@android:id/tabs"
FrameLayout의 아이디는 android:id="@android:id/tabcontent" 로 지정해주셔야 합니다.
<방법1 >

/day07_etcView/res/layout/tab.xml----------------------------------------------------------------------------------------
<?xml version="1.0" encoding="utf-8"?>
<TabHost xmlns:android="http://schemas.android.com/apk/res/android"
android:id="@+id/mytabhost"
android:layout_width="fill_parent"
android:layout_height="fill_parent" >
<LinearLayout
android:layout_width="fill_parent"
android:layout_height="fill_parent"
android:orientation="vertical" >
<!-- 지정해주는 대로 id 값을 줘야 합니다. 임의로 주면 안되요 -->
<TabWidget
android:id="@android:id/tabs"
android:layout_width="fill_parent"
android:layout_height="wrap_content" >
</TabWidget>
<!-- 지정해주는 대로 id 값을 줘야 합니다. 임의로 주면 안되요 -->
<FrameLayout
android:id="@android:id/tabcontent"
android:layout_width="fill_parent"
android:layout_height="fill_parent" >
<TextView
android:id="@+id/first"
android:layout_width="fill_parent"
android:layout_height="fill_parent"
android:text="First View" />
<TextView
android:id="@+id/second"
android:layout_width="fill_parent"
android:layout_height="fill_parent"
android:text="Second View" />
</FrameLayout>
</LinearLayout>
</TabHost>
-------------------------------------------------------------------------------------------------------------------------
/day07_etcView/src/kr/kitri/day07/etcview/TabTestActivity.java-------------------------------------------------------------
package kr.kitri.day07.etcview;
import android.app.Activity;
import android.os.Bundle;
import android.widget.TabHost;
import android.widget.TabWidget;
import android.widget.TabHost.TabSpec;
//일반 Activity 를 이용하여 탭작성하기
public class TabTestActivity extends Activity {
TabWidget tw;
@Override
public void onCreate(Bundle savedInstanceState) {
super.onCreate(savedInstanceState);
setContentView(R.layout.tab);
// 전체 탭 불러와서, 탭 위젯의 탭 스펙에(얘가 흔히 tab 이라 불리죠) 각각 붙여넣어주는 코드 작성 해야 합니다
TabHost tabhost = (TabHost) findViewById(R.id.mytabhost); // 1. 전체 tabHost 불러온겁니다.
tabhost.setup(); //<- 초기작업
TabSpec spec = tabhost.newTabSpec("Tab1"); //2. 스펙(탭) 만들어줍니다
//3. 만들어진 탭버튼에 아이콘을 넣어주거나 꾸며 줘야죠? content 연결 작업도 이루어집니다.
spec.setContent(R.id.first); // 컨텐츠 연결
spec.setIndicator("tab one"); // 아이콘 대신.. 문자열만 넣어보도록 하죠.
//4. 꾸미기 작업 끝나면, tabHost 에 스펙을 연결합니다.
tabhost.addTab(spec);
spec= tabhost.newTabSpec("Tab2"); //탭 두개 만들었네요 위와 같이 반복처리 하면 되겠죠?
spec.setContent(R.id.second);
spec.setIndicator("tab two");
tabhost.addTab(spec);
}
}
-------------------------------------------------------------------------------------------------------------------------
<방법 2>

/day07_etcView/res/layout/tab2.xml-----------------------------------------------------------------------------------------
<?xml version="1.0" encoding="utf-8"?>
<TabHost xmlns:android="http://schemas.android.com/apk/res/android"
<!-- 지정해주는 대로 id 값을 줘야 합니다. 임의로 주면 안되요 -->
android:id="@android:id/tabhost"
android:layout_width="fill_parent"
android:layout_height="fill_parent" >
<LinearLayout
android:layout_width="fill_parent"
android:layout_height="fill_parent"
android:orientation="vertical" >
<!-- 지정해주는 대로 id 값을 줘야 합니다. 임의로 주면 안되요 -->
<TabWidget
android:id="@android:id/tabs"
android:layout_width="fill_parent"
android:layout_height="wrap_content" >
</TabWidget>
<!-- 지정해주는 대로 id 값을 줘야 합니다. 임의로 주면 안되요 -->
<FrameLayout
android:id="@android:id/tabcontent"
android:layout_width="fill_parent"
android:layout_height="fill_parent" >
<TextView
android:id="@+id/first02"
android:layout_width="fill_parent"
android:layout_height="fill_parent"
android:text="First View" />
<TextView
android:id="@+id/second02"
android:layout_width="fill_parent"
android:layout_height="fill_parent"
android:text="Second View" />
</FrameLayout>
</LinearLayout>
</TabHost>
-------------------------------------------------------------------------------------------------------------------------
/day07_etcView/src/kr/kitri/day07/etcview/TabHostAvtivityTest.java---------------------------------------------------------
package kr.kitri.day07.etcview;
import android.app.Activity;
import android.app.TabActivity;
import android.content.res.Resources;
import android.graphics.drawable.Drawable;
import android.os.Bundle;
import android.widget.TabHost;
import android.widget.TabHost.TabSpec;
public class TabHostAvtivityTest extends TabActivity {
@Override
public void onCreate(Bundle savedInstanceState) {
super.onCreate(savedInstanceState);
setContentView(R.layout.tab2);
TabHost tabhost = getTabHost();
// 첫번째 탭
TabSpec spec = tabhost.newTabSpec("tab1");
spec.setContent(R.id.first02);
Resources res = getResources();// tab 버튼이 이미지 넣어봅시다. 그럴려면,resource 가 필요하답니다
Drawable icon = res.getDrawable(android.R.drawable.ic_dialog_email);
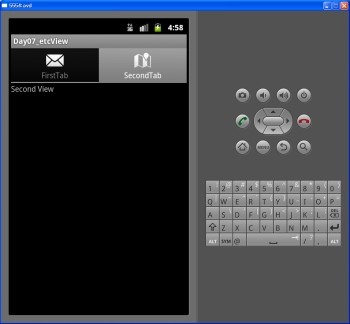
spec.setIndicator("FirstTab", icon);
tabhost.addTab(spec);
// 두번째 탭
spec = tabhost.newTabSpec("tab2");
spec.setContent(R.id.second02);
Drawable icon2 = res.getDrawable(android.R.drawable.ic_dialog_map);
spec.setIndicator("SecondTab", icon2);
tabhost.addTab(spec);
}
}
-------------------------------------------------------------------------------------------------------------------------
'Programming > Android' 카테고리의 다른 글
| [Android] 해상도에 따른 비트맵 리사이즈 (0) | 2014.04.18 |
|---|---|
| [안드로이드 Android] 사진 업로드 (0) | 2014.04.16 |
| [안드로이드 Android] 어플리케이션 로딩화면(Splash) 구현하기 (0) | 2013.06.27 |
| [안드로이드 Android] f3 보이게 하는 방법(android.jar source 보이는 방법) (0) | 2013.06.27 |
